Master Group and Sub-Groups
This guide explains the Master Group and Sub-Groups (Review or Submission Groups) in detail.
Setup Overview: A Group Manager sets up the Master Group and creates the review/submission sub-groups associated with the Master Group. Once the sub-groups have been created, users can be invited to join or the user can ask to join each sub-group as appropriate. Once a user joins a sub-group, they are automatically added to the Master Group user list. However, adding a user to a Master Group will not automatically add the user to the sub-groups. All of these steps are covered in this guide “How to Create & Manage a Master Group & Sub-Group(s)”
Permissions are now assigned on both a Master Group basis and a sub-group basis. These permissions will control what activities each user can perform. Within the Master Group, permissions for the bulk features described above are available; within the sub-groups, permissions for review actions, accreditation completion, and submission are available. The steps on how to change a user’s permissions within a Master Group can be found here: "How to Set Permissions for Forensics Master Group Members” The steps on how to change a user’s permissions within a sub-group are covered in this guide: “How to Set Permissions for Forensics Group Members”.
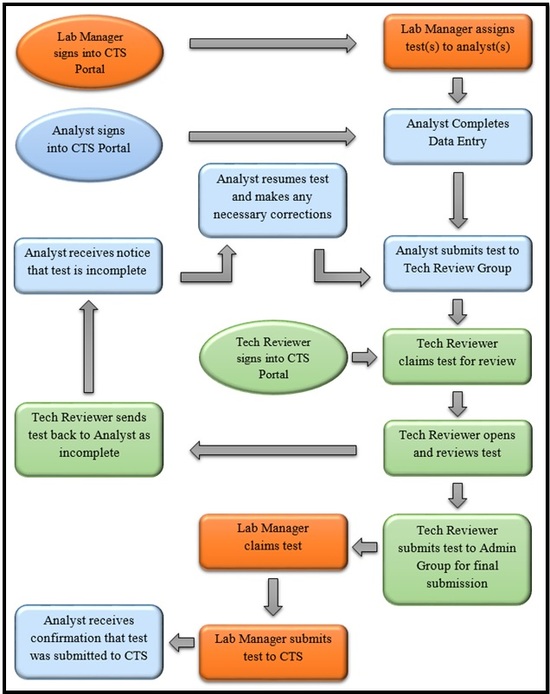
Work Flow Example: Once all groups are set up, an analyst claims a test using the Participant Code and Web code located on their data sheet (“How to Claim a Test for Data Entry”), or the test is assigned by the Master Group directly to the analyst (“How to Assign a Test to User(s) through a Master Group”). The analyst completes the data entry response (“How to Complete Data Entry”). Once the test is finished, the analyst forwards the test to the Review Group ("How to Hand in a Test for Review"). A Tech Reviewer will claim the test and review it. After the test is done being reviewed, the Tech Reviewer forwards the test to the Admin Group or back to the analyst as incomplete (“How to Review a Test and Perform Post Review Actions”). If the test is sent back to the analyst as incomplete, the analyst can correct the test and then resubmit the test to the Review Group for additional review. Once the test is complete and forwarded to the Admin Group, additional reviews can take place at this level, or the Manager can use this group to fill out the accreditation and submit to CTS. The Manager can also utilize the bulk features of the Master Group at this stage to submit the test to CTS instead of through the group directly (“How to Perform Master Group Dashboard Actions”).
In the scenario used in our flow chart below, there is one Master Group set up with two sub-groups. One group is a Tech Review Group and the other is an Admin Group. We are using the Tech Review Group as a review only group, so the Analyst, the Tech Reviewer, and the Lab Manager are all users of that group. The Admin group is used to submit the tests to CTS, so only the Tech Reviewer and the Lab Manager are users of that group.